
Entry
Reader's guide
Entries A-Z
Subject index
Appendix A: Taping and Bracing Techniques
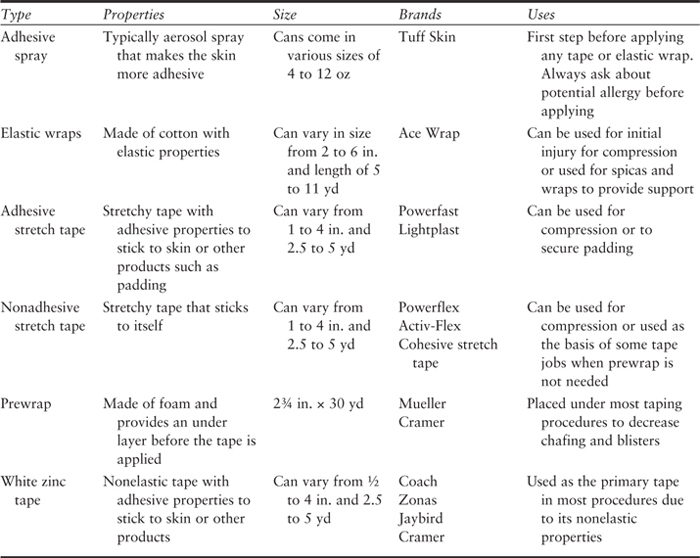
The step-by-step procedures in this appendix describe the basic taping and bracing techniques used today in sports medicine. The following table lists the various supplies typically used in these procedures.
Table 1 Taping Supplies and Equipment
This appendix includes discussions of 19 of the most common taping procedures, organized by body region:
- great toe taping
- arch taping
- closed basket weave
- achilles taping
- medial tibial stress syndrome taping
- McConnell taping
- knee hyperextension taping
- medial collateral ligament taping
- patellar tendinitis strap
- thigh compression wrap
- hip spica for adductor strain
- rib compression wrap
- shoulder spica for acromioclavicular taping
- elbow hyperextension tape
- ulnar collateral ligament taping
- lateral epicondylitis strap
- wrist hyperflexion taping
- buddy taping
- thumb spica
Great Toe Taping
Great toe taping is applied after injury to the first metatarsophalangeal (MTP) joint of the great toe after a hyperextension or hyperflexion injury and is associated commonly with “turf sports,” such as football, soccer, and field hockey. The goal of taping is to limit excessive and/or painful extension or flexion of the MTP joint.
Procedure
Materials. Adhesive spray, 1½-inch (in.; 1 in. = 2.54 centimeters [cm]) white tape, 1-in. white tape.
Positioning and Preparation. The patient is made to lie in the supine position with the knee in extension, foot in relaxed position, and great toe in neutral position. Apply adhesive spray to the foot and great toe where the tape will be applied.
Application
1. Apply an anchor around the midfoot with the 1½-in. white tape. Apply the second anchor with the 1-in. tape around the great toe distally.
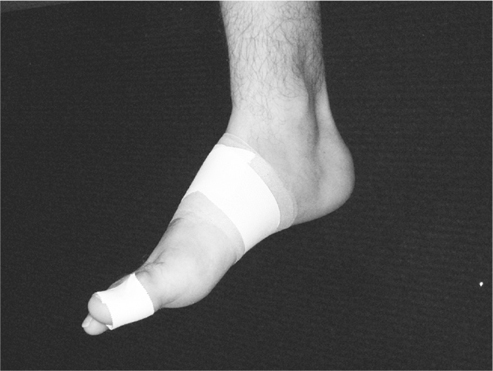
2. Apply a fan strip with the 1-in. white tape from the second anchor on the distal great toe. Position the great toe into slight flexion within the painfree range. Secure the first fan strip to the initial anchor. Repeat two to three times with additional fan strips to secure the great toes in painfree position.
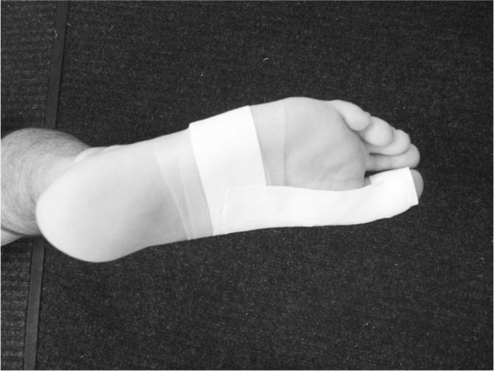
3. To secure the fan strips, place the 1½-in. white tape over the initial anchor and the 1-in. white tape over the second anchor.
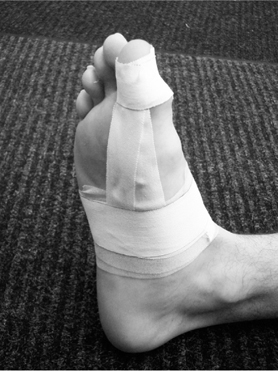
Final Assessment. Check for circulation and ensure that the application has limited the painful motion and is functional for the athlete.
Additional Notes
4. To limit painful flexion, reverse the fan strips, applying ventrally while placing the great toe in slight extension.
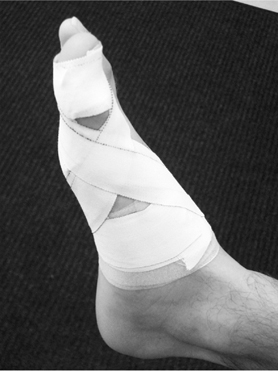
5. To gain additional support for cases of multidirectional instability and/or pain, apply toe spica consisting of two 1-in. white tape strips crossing over the medial MTP joint of the great toe prior to the final anchors. Secure with anchors as described above.
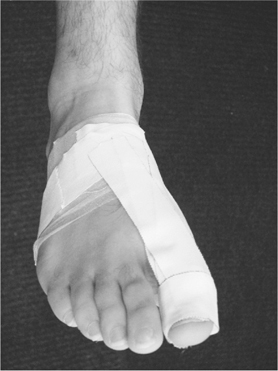
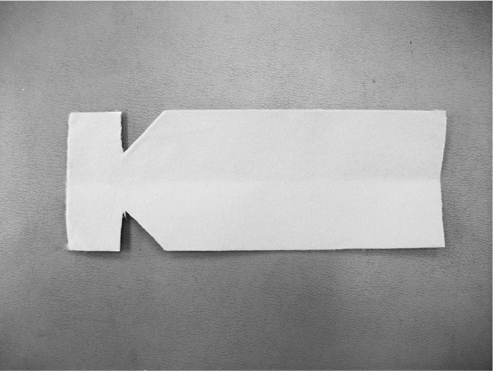
∗Custom/Prefabricated Items. Great toe ∗ extension may also be limited by prefabricated steel inserts or a precut plantar fascia strip.
Arch Taping
Arch taping is applied to those individuals who require additional support to their arch in an effort to prevent excessive pronation. With this goal, excessive motion may be limited during gait, and pain in the lower extremity structures irritated by this motion may resolve.
Procedure
Materials. Adhesive spray, 1½-in. white tape, 1-in. white tape.
Positioning and Preparation. The patient is made to lie in the supine position with the knee in extension and the foot in relaxed position. Lightly spray the arch with the adhesive spray, and let it dry.
Application
1. Gently apply a half-anchor of the 1½-in. white tape around the metatarsal heads, pulling from the lateral to the medial direction.
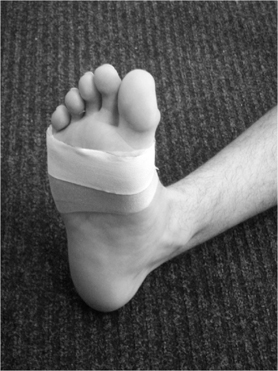
2. Apply the 1-in. white tape in an X pattern with three “Xs” running from the first metatarsal head around the heel and returning to the fifth metatarsal head and three “Xs” running from the fifth metatarsal head around the heel and returning to the first metatarsal head. Overlap each “X” while filling in the arch space. Use a minimum of six “Xs” to fill in the entire arch space.
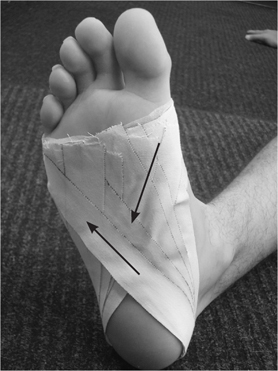
3. Apply the 1½-in. white tape half-anchors, pulling lateral to medial to cover the arch. Anchors should start proximal and continue distally. Be sure to cover all the loose ends.
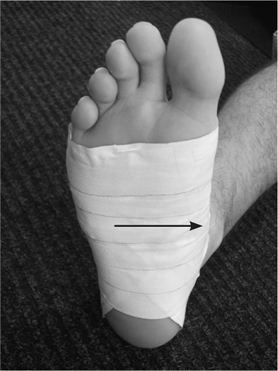
4. Complete by securing with two full 1½-in. white tape anchors around the metatarsal heads.
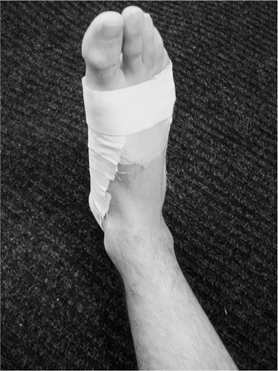
Final Assessment. Check for circulation, and ensure that the application has limited the painful motion and is functional for the athlete.
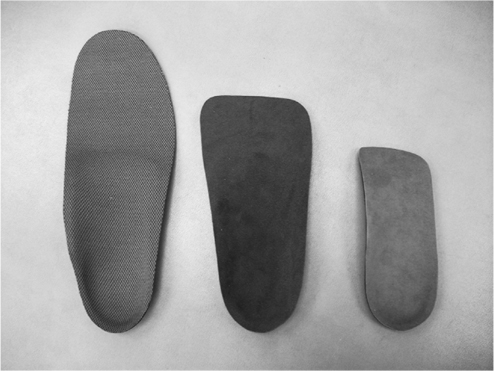
∗Custom/Prefabricated Items. Supporting the arch can also be achieved by purchasing off-the-shelf orthotics or custom shoe inserts.
Closed Basket Weave
The closed basket weave is used after an inversion ankle sprain and is one of the most commonly seen tape procedures in sports medicine. It can be used both as a prevention measure and to limit inversion after injury.
Procedure
Materials. Heel and lace pads, adhesive spray, 1½-in. white tape, prewrap.
Positioning and Preparation. The patient is made to lie in the supine position with the knee in extension and ankle in a dorsiflexed position. Lightly spray the ankle with the adhesive spray, and let it dry.
Application
1. Apply at least one heel and lace pad at the front of the ankle and the other at the back where the Achilles tendon inserts into the calcaneus. Secure the pads with the prewrap, and cover the area where the tape will be applied.
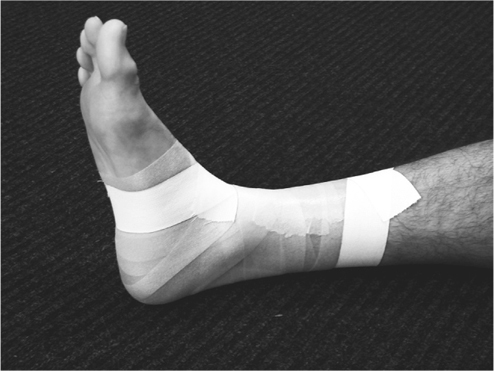
2. Apply one anchor of the 1½-in. white tape 6 in. above the malleoli, adhering the prewrap to the skin. The second anchor should be placed around the midfoot while avoiding direct compression of the base of the fifth metatarsal.
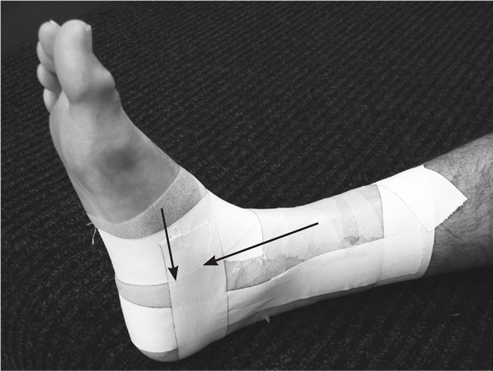
3. Apply a stirrup running from the medial to lateral direction, from the medial proximal anchor to the lateral side, extending just above the anchors on both sides; this should cover the posterior one third of the malleoli. Apply the first horseshoe starting directly on the metatarsal anchor along the first metatarsal, traveling behind the heel, and ending along the fifth metatarsal. Apply horseshoes always from the medial to lateral direction unless your goal is to limit eversion, in which case the pull would be in the opposite direction.
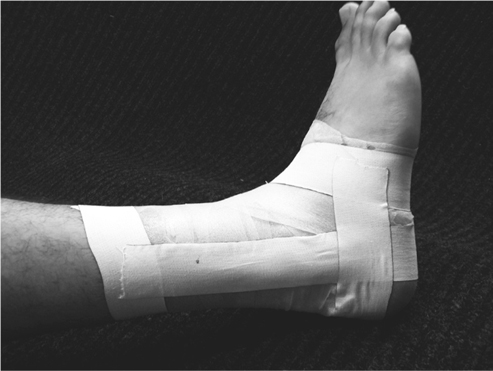
4. Apply each additional stirrup in the same fashion while overlapping by half the width of the tape. The second stirrup should cover the middle one third of the malleoli, with the third stirrup covering the anterior one third. Apply horseshoe strips in the same manner, with each strip slightly shorter than the previous, leaving a staircase appearance. Apply the stirrups and the horseshoes in an alternating fashion.
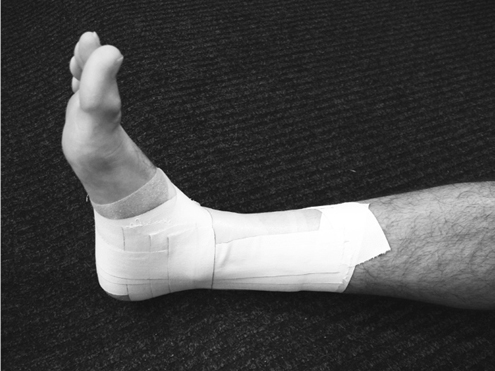
5. Follow the third horseshoe up the leg until you have completely enclosed the ankle and have ended just past your initial anchor. These strips should continue to be applied by overlapping half the width of the tape. Apply additional arch support until the bottom is enclosed.
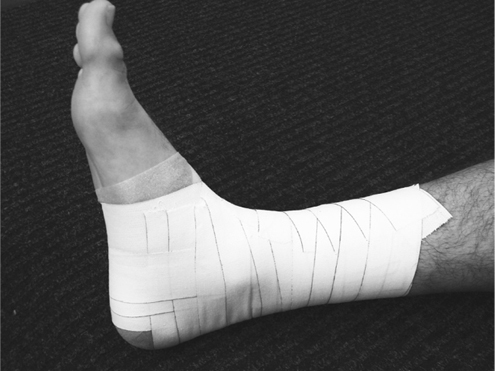
6. Start applying the tape on the lateral malleolus, and pull around the arch of the foot to begin a figure-eight pattern.
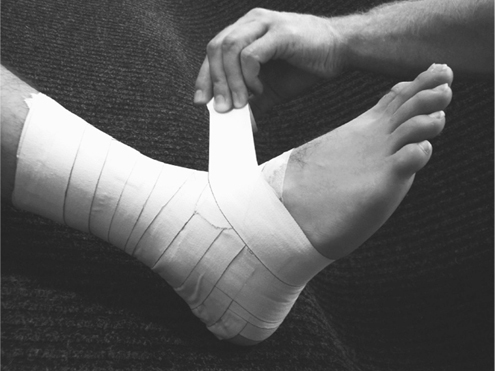
7. Continue the figure-eight pattern by completing a full turn around the ankle so that the roll of tape ends on the medial side, moving downward toward the medial malleolus.
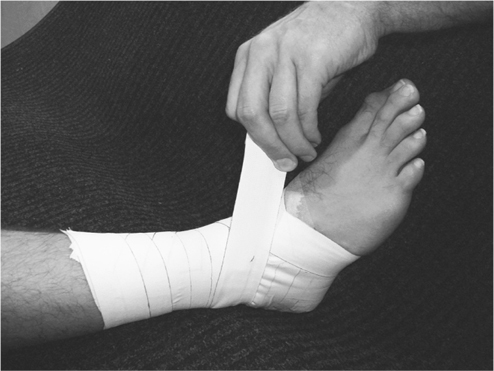
8. From this position, direct the roll of tape to the outside of the heel, and apply a heel lock, ending with the roll of tape moving in a caudal position.
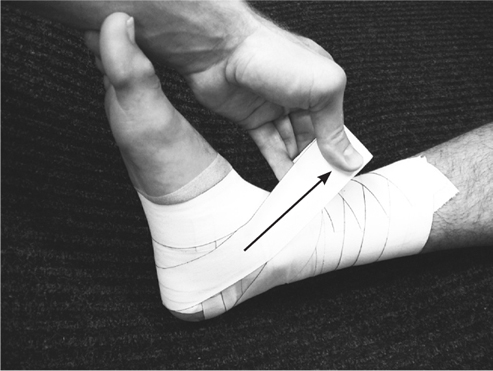
9. Continue by pulling the tape up and around the ankle with a complete turn.
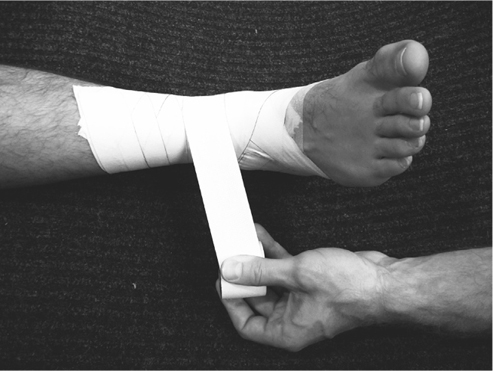
10. Once around the ankle, continue along the lateral ankle, moving toward the medial side of the heel, and apply another heel lock.
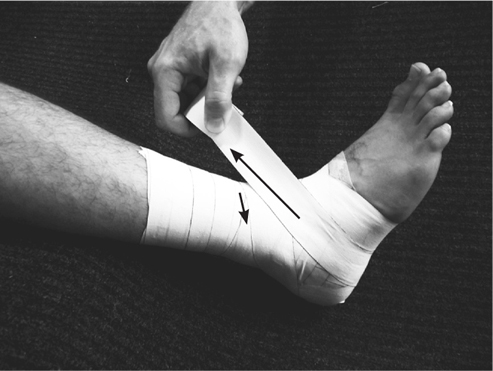
11. Once around the ankle, the tape may finish anywhere. Additional figure-eight and heel locks may be added depending on the severity of the injury or the size of the athlete.
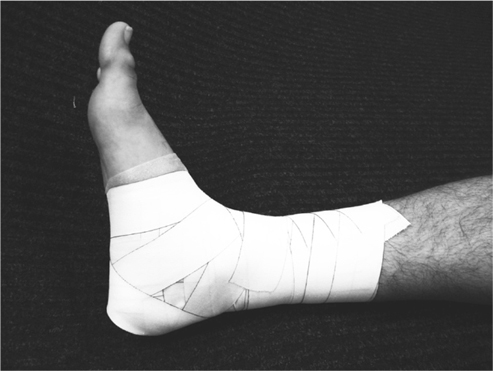
Final Assessment. Check for circulation, and ensure that the application has limited either the painful motion or the inversion and is functional for the athlete.
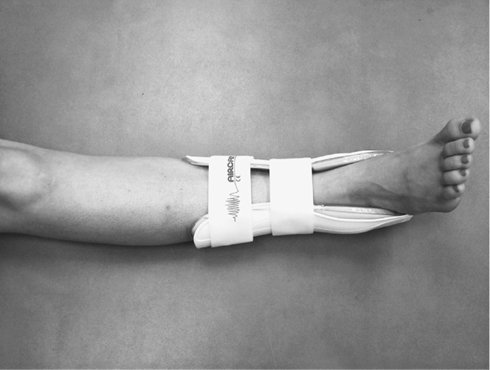
∗Custom/Prefabricated Items. A number of ankle braces can be purchased with the benefits of self-application and increased cost-effectiveness.
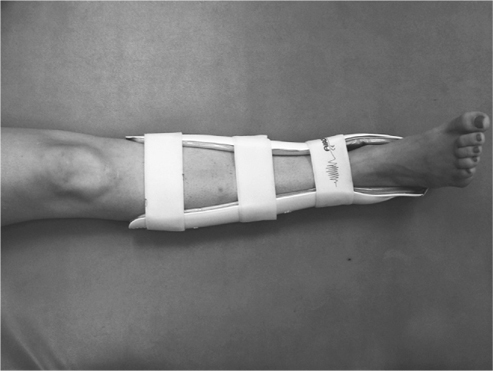
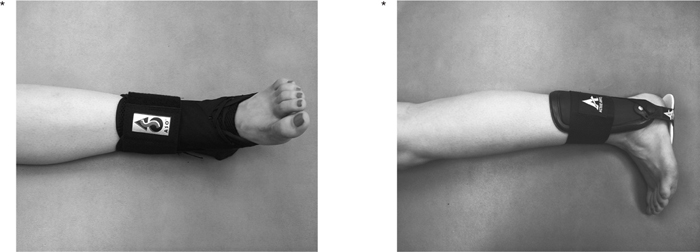
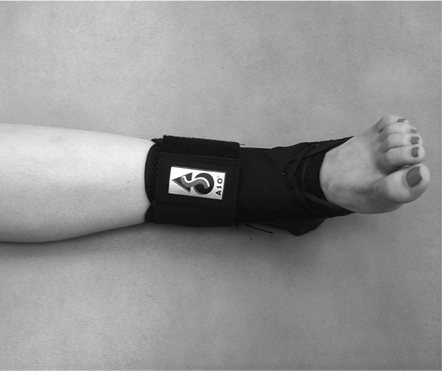
Achilles Taping
Achilles taping is applied to those individuals who suffer from pain with plantarflexion and where additional support and help with this motion are required. The goal of this tape job is to assist in the motion of plantarflexion and alleviate pain and discomfort.
Procedure
Materials. Prewrap, adhesive spray, 1½-in. white tape, 3-in. heavy-duty tape.
Positioning and Preparation. The patient is made to lie in the prone position with the knee in extension and the foot in relaxed position, slightly plantarflexed. Lightly spray the foot and ankle with the adhesive spray.
Application
1. Apply the prewrap around the foot, ankle, and lower leg. Apply an anchor of the 1½-in. white tape around the metatarsal heads and the other anchor 6 in. above the malleoli. Starting dorsally on initial anchor, apply the 3-in. heavy-duty stretch tape running to the anchor on the lower leg while the foot maintains a relaxed position. The first strip should run in a straight fashion.
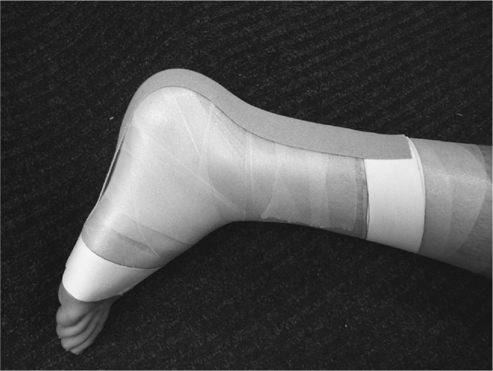
2. Apply two additional 3-in. heavy-duty stretch tape strips with each crossing over the painful site to form an X pattern.
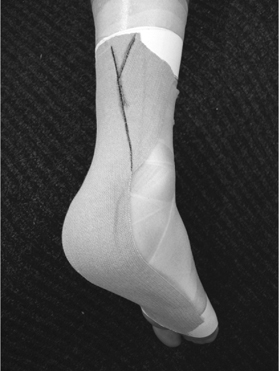
3. Cover the anchors with the 1½-in. white tape, ensuring that there are no loose ends.
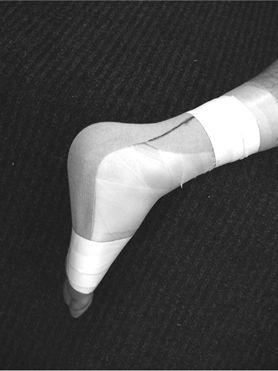
Final Assessment. Check for circulation, and ensure that the application has limited the painful motion and is functional for the athlete.
Medial Tibial Stress Syndrome Taping
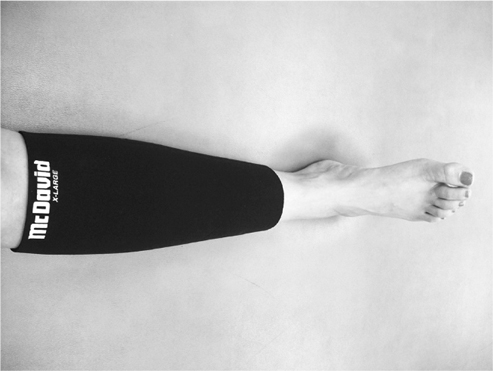
Medial tibial stress syndrome (MTSS) or shin splint taping is applied to those individuals who suffer from pain in their lower leg during activity. Also known as an open spiral, the goal of this taping is to compress the musculature of the anterior lower leg to alleviate pain.
Procedure
Materials. Adhesive spray, 1½-in. white tape.
Positioning and Preparation. The patient is made to lie in the supine position with the knee in extension and foot in relaxed position. Lightly spray the lower leg with the adhesive spray, and let it dry.
Application
1. Apply a strip of the 1½-in. white tape starting laterally, or opposite to the painful side and 2 in. below. Wrap the tape around lower leg while squeezing the Achilles tendon, and end the strip just past the starting point. Always pull the tape so that the painful area moves toward the tibia.
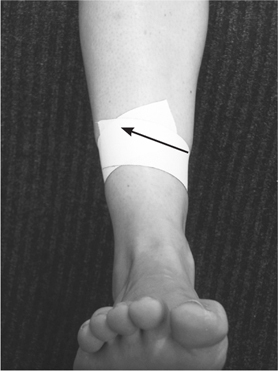
2. Continue to apply additional strips in the same fashion. Be sure to overlap half of the previous strip. Each strip is applied tightly. Continue strips application until you are 2 in. above the painful site. Each individual strip should overlap and enclose the previous strip. Complete by applying a full anchor on both proximal and distal ends.
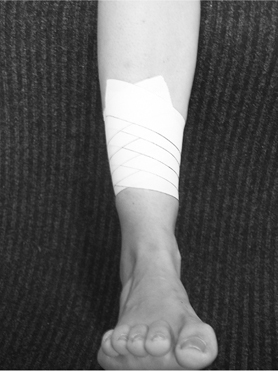
Final Assessment. Check for circulation, and ensure that the application causes limited pain and is functional for the patient.
∗Custom/Prefabricated Items. A number of commercial compression sleeves are available that re-create the same effect.
McConnell Taping
McConnell taping is applied typically to treat patellofemoral stress syndrome (PFSS), which typically occurs with abnormal tracking of the patella. The goal of taping the patella is to restore proper tracking mechanics of the patella and to decrease or relieve painful knee biomechanics.
Procedure
Materials. Adhesive spray, 2-in. coverall, 1½-in. leukotape, scissors.
Positioning and Preparation. Check the skin for wounds and irritation. Remove excessive hair with a razor. The patient should be made to lie in the supine position on a table with the knee fully extended; the quadriceps should be fully relaxed to allow patella mobility. Apply adhesive spray to the knee where the tape will be applied, and allow it to dry.
Application
1. Cut strips of coverall long enough to cover the patella and the medial knee. Then apply these strips as a base covering the patella and medial knee.
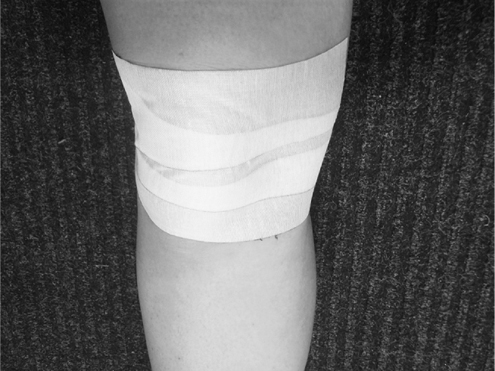
2. To limit lateral tracking, apply a strip of leukotape laterally on the patella, then pulling medially and placing the other end over the medial knee. Cut off the excess tape.
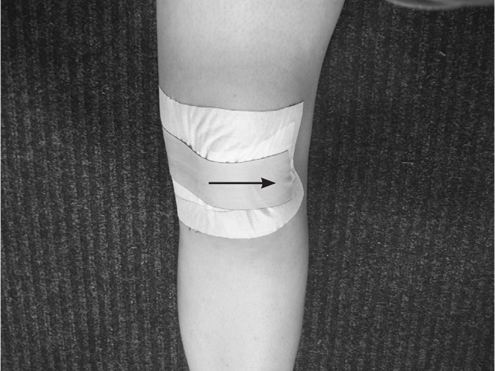
3. Apply two or three more strips as described above, covering the patella.
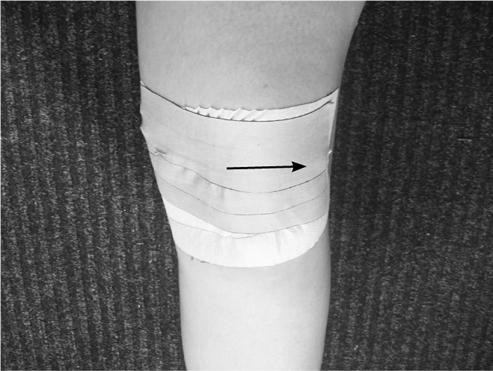
Final Assessment. Check the range of motion (ROM) of the knee and the comfort of the tape. Ensure that the application has limited the painful motion and is functional for the patient.
Additional Notes
4. To ensure that the tape will remain on and not fall off prematurely during activity, you may wrap it with nonadhesive stretch tape.
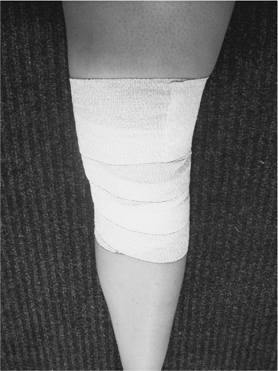
5. To limit tilting in other directions, pull the leukotape in the opposite direction of the motion that you are trying to limit.
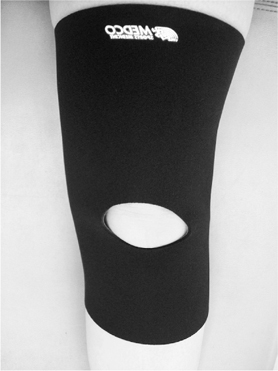
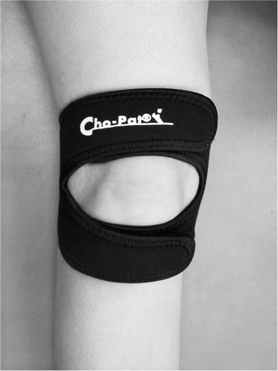
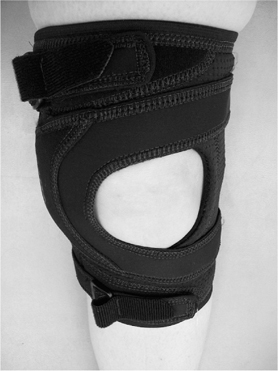
∗Custom/Prefabricated Items. Abnormal patella tracking can also be altered by using a commercial brace with a patella buttress.
Knee Hyperextension Taping
Knee hyperextension taping is applied when a knee hyperextension injury has occurred. The goal of this tape job is to limit painful knee extension.
Procedure
Materials. Adhesive spray, prewrap, 2-in. heavy-duty elastic tape, 3-in. adhesive elastic tape, scissors.
Positioning and Preparation. Check the skin for wounds and irritation. The patient should be standing with the affected knee flexed 25° to 35° or within a painfree ROM. The patient should have a good portion of his or her weight over the affected leg and with the quadriceps contracted so that the wrap is not too tight. Apply adhesive spray to the lower leg and thigh where the tape will be applied.
Application
1. Apply the prewrap over the entire area that will be taped, starting at the midthigh and continuing distally to the midgastrocnemius. (Note: The longer the level of the tape job, the more effective it will be in preventing painful ROM.) Apply two anchors with the 3-in. adhesive elastic tape over the prewrap, one on the midthigh and the other on the midgastroc.
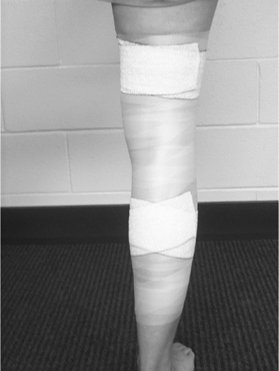
2. Apply strips of the 2-in. heavy-duty elastic tape in an X pattern behind the knee. The first strip should be applied laterally on the thigh anchor, crossing the posterior knee and ending at the medial anchor on the gastrocnemius. Cut off the excess heavy-duty elastic tape.
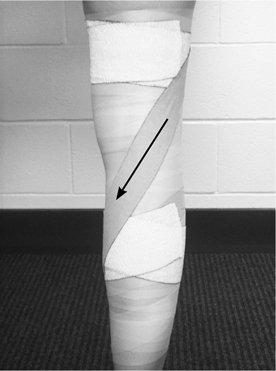
3. The second strip is applied medially on the thigh anchor, crossing the posterior knee and ending on the lateral anchor on the gastroc. Cut off the excess heavy-duty elastic tape.
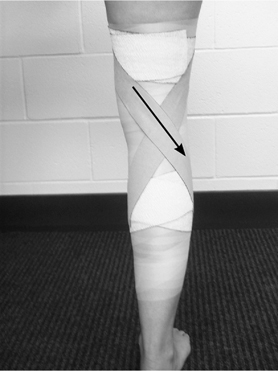
4. Apply two more strips as described above, creating an X pattern behind the knee.
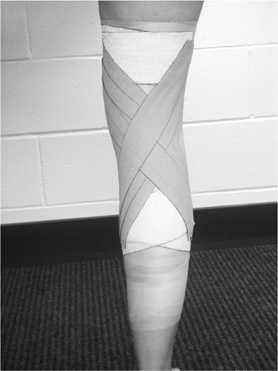
5. Cover the distal anchors up to the tibial tuberosity with the 3-in. adhesive stretch tape. Cover the proximal anchors distally with the 3-in. adhesive stretch tape, ending 3 in. above the superior patella. Note: To ensure normal tracking of the patella, do not cover the patella with the tape.
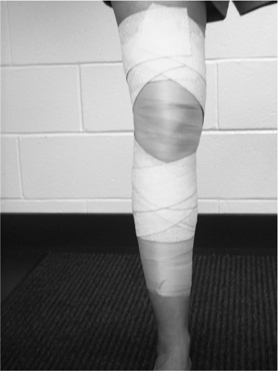
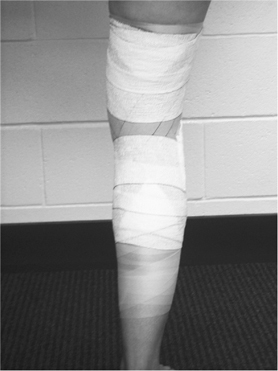
Final Assessment. Check the ROM of the knee and the comfort of the tape. Ensure that the application has limited the painful motion of the knee and is functional for the athlete.
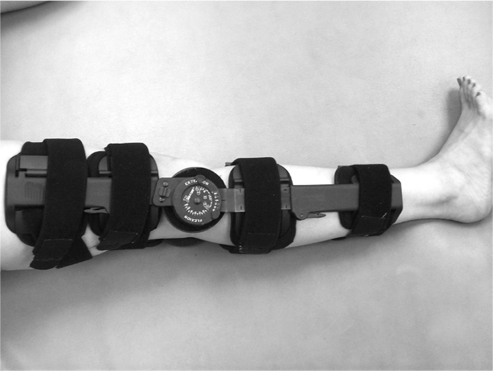
∗Custom/Prefabricated Items. Off-the-shelf braces with an ROM lock can limit the painful ROM—such as a knee immobilizer.
Medial Collateral Ligament Taping
Collateral ligament taping is applied when either the medial collateral ligament (MCL) or the lateral collateral ligament (LCL) is sprained. The goal of this tape job is to protect the ligament from further injury.
Procedure
Materials. Adhesive spray, prewrap, 1½-in. white tape, 3-in. adhesive elastic tape.
Positioning and Preparation. Check the skin for wounds and irritation. The patient should be standing with the affected knee slightly flexed and within a painfree ROM. The patient should have a good portion of his or her weight over the affected leg and with the quads contracted so that the wrap is not too tight. Apply adhesive spray to the knee and thigh where the tape will be applied.
Application
1. Apply the prewrap over the entire area that will be taped; starting at the upper thigh and continuing down to the midgastrocnemius. Apply two anchors with the 3-in. adhesive elastic tape on the upper thigh and midgastroc.
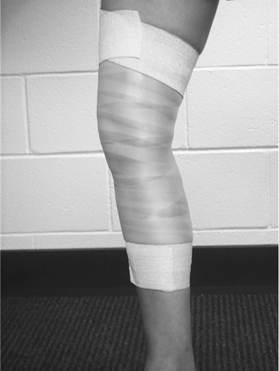
2. Apply strips of the 1½-in. white tape in an X pattern over the MCL. The first strip will be applied on the anterior thigh anchor, crossing the medial joint line and ending at the posterior anchor on the gastrocnemius.
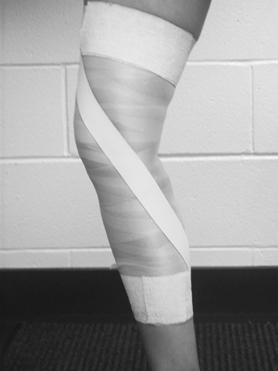
3. The second strip will be applied on the posterior thigh anchor, crossing the medial joint line and ending on the anterior anchor on the gastroc.
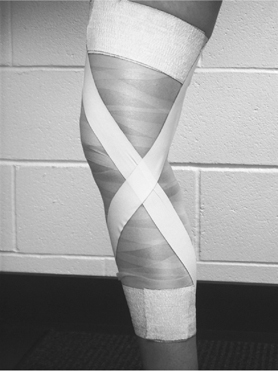
4. Apply two or three more strips as described above, creating an X pattern over the medial joint line.
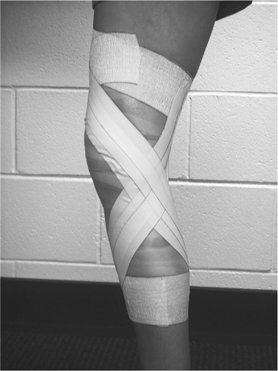
5. Cover the distal anchors up to the tibial tuberosity with the 3-in. adhesive stretch tape. Cover the proximal anchors distally with the 3-in. adhesive stretch tape ending 3 in. above the superior patella. Note: Do not cover the patella with the tape, to ensure normal tracking of the patella.
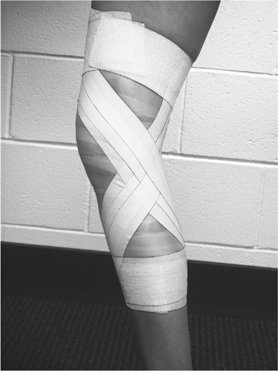
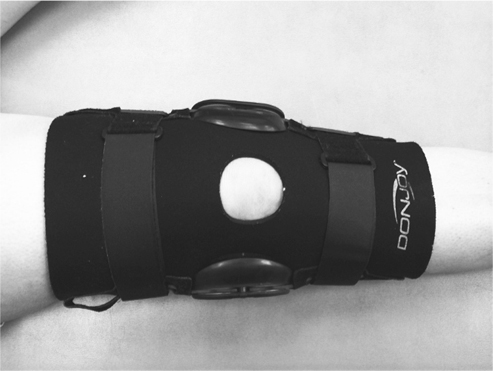
∗Final Assessment. Check the ROM of the knee and the comfort of the tape. Ensure that the application is functional for the patient and gives support to the MCL.
Additional Notes
To tape for an LCL sprain, follow the previous steps, with the X pattern applied over the LCL.
∗Custom/Prefabricated Items. Off-the-shelf braces with a medial stabilizer can be applied.
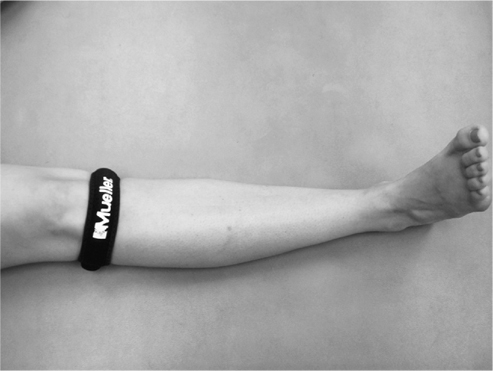
Patellar Tendinitis Strap
A patellar tendinitis strap is applied for a patient suffering from patella tendinitis (jumper's knee) or Osgood-Schlatter disease. The goal of this tape job is to decrease pain by applying pressure to the tendon and decreasing the stress of the tendon on the tibial tuberosity, where it inserts.
Procedure
Materials. Prewrap, 1½-in. white tape.
Positioning and Preparation. Check the skin for wounds and irritation. The patient should be standing with the affected knee slightly flexed and within a painfree ROM.
Application
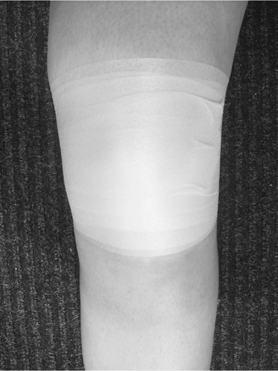
1. Apply the prewrap, encircling the knee over the patella six to eight times with equal tension.
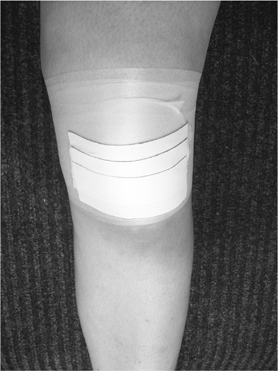
2. Apply three strips of the 1½-in. white tape anteriorly in the center of the prewrap.
3. Roll the prewrap and tape from the proximal to distal direction to create a strap. Place the strap over the patellar tendon.
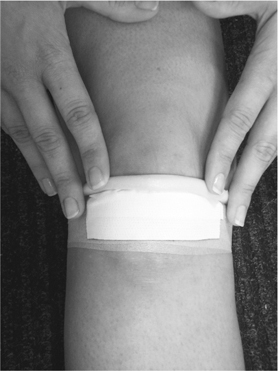
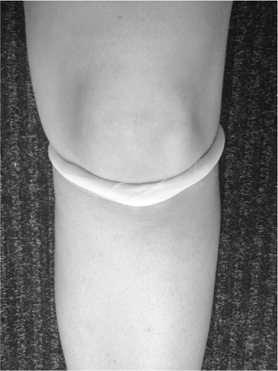
Final Assessment. Check the ROM of the knee and the comfort of the tape. Ensure that the application has adequate pressure on the patellar tendon and is functional for the patient.
∗Custom/Prefabricated Items. Jumper's knee straps can be purchased over the counter to re-create this tape job.
Thigh Compression Wrap
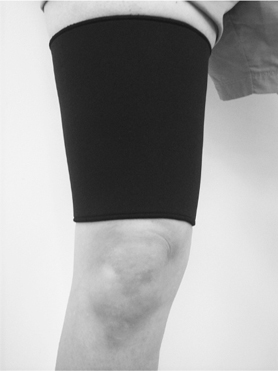
A thigh compression wrap may be applied after an injury such as a contusion or muscle strain to either the hamstring or the quadriceps muscle group. The goal of this wrap is to compress the muscle group and the origin of pain while providing support.
Procedure
Materials. Adhesive spray, 6-in. single elastic bandage, 1½-in. white tape. Note: Depending on the size of the patient, you may have to use a larger elastic wrap, 6 in. ? 5 yards (yd), 6 in. ? 11 yd, or 4 in. ? 11 yd (1 in. = 2.54 cm; 1 yd = 0.91 meters [m]).
Positioning and Preparation. The patient should be standing with the involved knee flexed between 20° and 30° while keeping the majority of the patient's weight on the involved side. Apply spray on the area to be wrapped, and allow it to dry.
Application
1. Begin distal to the site of pain, and apply the compression wrap around the area to be treated in a herringbone fashion with the “Xs” central over the site of pain.
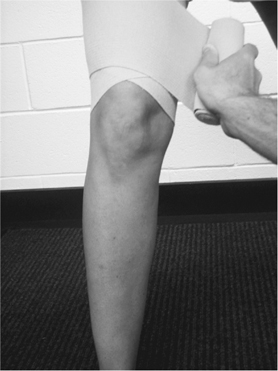
2. Continue proximally overlapping the compression wrap by half the width of the wrap.
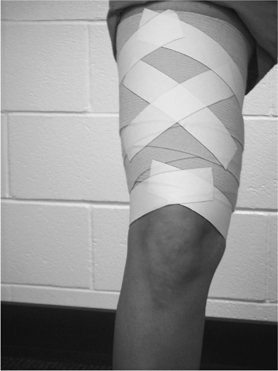
3. Secure the wrap with the 1½-in. white tape by placing an “X” over the painful area, and anchor at the top and bottom.
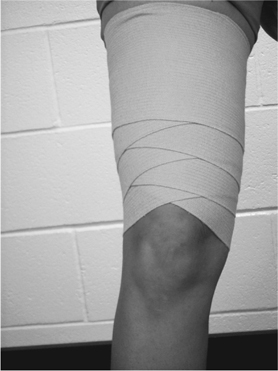
Final Assessment. Check for circulation, and ensure that the application has limited the painful motion and is functional for the athlete.
∗Custom/Prefabricated Items. Commercial compression sleeves, both with and without additional padding, are available.
Hip Spica for Adductor Strain
A hip spica may be used for a number of conditions, including support of the adductor and hip flexor groups in addition to securing padding after an injury to the hip bone, or “hip pointer.” The goal of this supportive wrap is to compress the muscle group and origin of pain while providing support and aiding in the natural motion of the muscle group.
Procedure
Materials. Adhesive spray, 4-in. double-elastic bandage, 1½-in. white tape. Note: Depending on the size of the patient, you may have to use a larger elastic wrap, such as 6 in. ? 11 yd.
Positioning and Preparation. The patient should be standing with the involved leg placed in an internally rotated position. Ask the athlete to assume a slightly forward-lunge position that flexes the knee and causes the hip to adduct. Gently spray the thigh area that will be wrapped, which acts as the anchor for this tape procedure. Note: For maximum support, have the athlete wear spandex or tight shorts so that the wrap can be as close to the body part as possible.
Application
1. Secure the wrap to the leg by anchoring the wrap around the thigh while pulling laterally to medially.
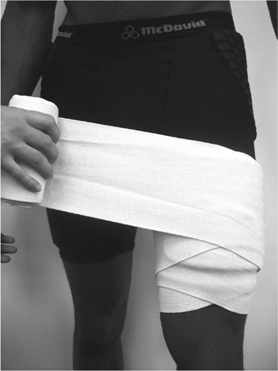
2. Continue wrapping up and around the trunk, crossing deep in the groin over the adductor muscle group.
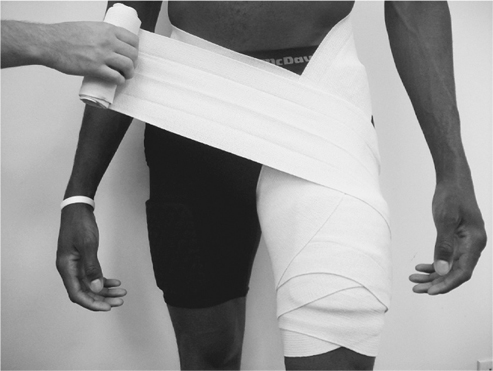
3. Finish the wrap on the thigh, and secure with the 1½-in. white tape by tracing the pattern once around the thigh and trunk. Add more tape strips as needed.
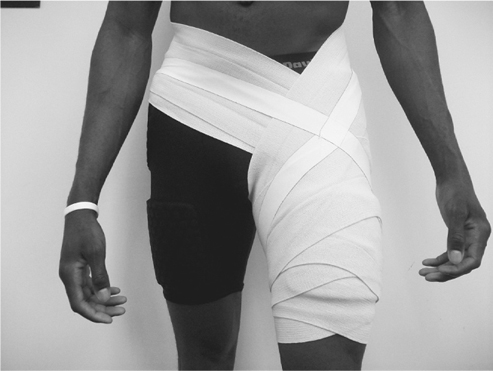
4. To secure the wrap further, you can trace the pattern of the wrap with the 3-in. adhesive elastic tape.
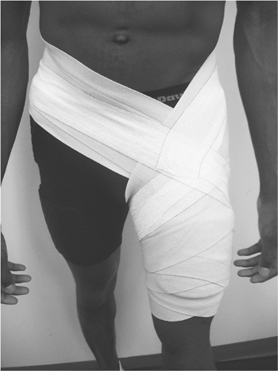
Additional Notes
To provide supportive taping for the hip flexor, begin in a similar fashion to the hip adductor wrap but with the patient in a slightly forward-lunge position with a slight forward bend at the trunk. Pull the wrap from medial to lateral, and place an “X” over the site of pain or the hip flexor group.
Custom/Prefabricated Items. Commercial compression garments can be purchased that offer focal and general compression.
Rib Compression Wrap
A rib compression wrap is used to relieve the pain of a rib fracture or intercostal strain, secure a protective pad over an injured site, or control swelling. The goal of the wrap is to provide support to the injured area and decrease pain.
Procedure
Materials. Adhesive spray, 4-in. × 5-yd elastic wrap, 1½-in. white tape. Note: Depending on the size of the patient, you may have to use a larger elastic wrap, 6 in. × 5 yd, 6 in. × 11 yd, or 4 in. × 11 yd.
Positioning and Preparation. Check the skin for wounds and irritation. The patient should be standing with the arms abducted. Apply adhesive spray to the torso where the elastic bandage will be applied.
Application
The procedure described below is for a rib fracture. The injured area is marked “+.”
1. Start the wrap superiorly to the injured site, encircling the torso and overlapping about 2 in. each time around.
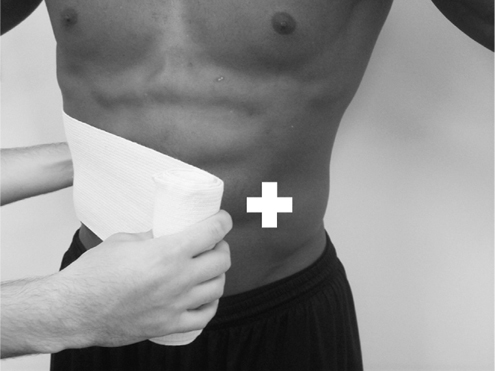
2. Work your way caudally, covering the injured site and ending over the wrap superiorly to the injured area.
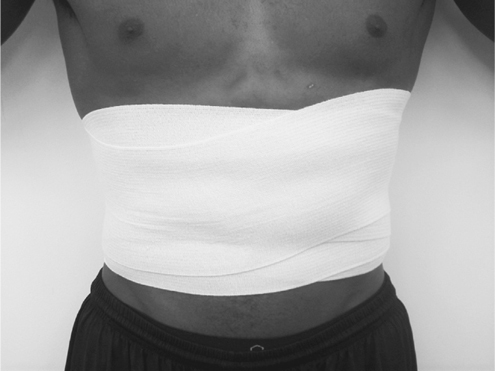
3. Apply two to three strips of the 1½-in. white tape at the end of the wrap to secure it.
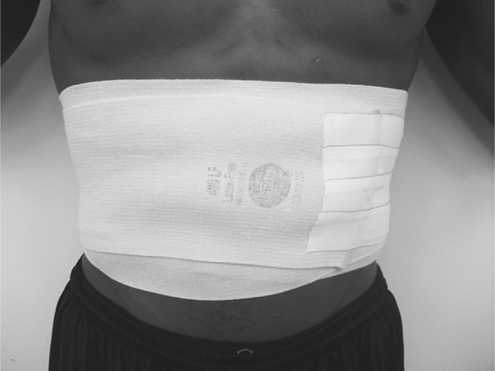
4. To secure the wrap, you may encircle the wrap and tape with the 3-in. adhesive elastic tape.
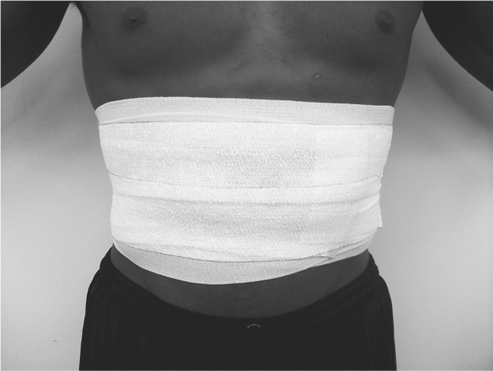
Final Assessment. Check the ROM of the torso and the comfort of the athlete during respiration. Ensure that the application provides support to the injured site and is functional for the athlete.
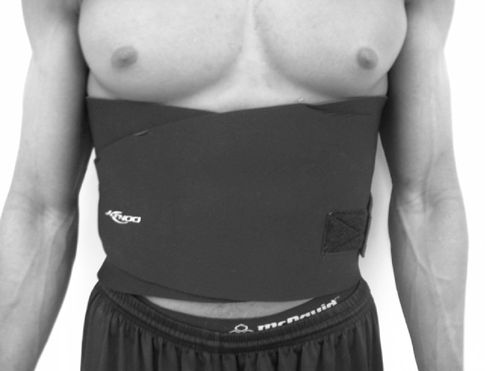
∗Custom/Prefabricated Items. Rib belts can be purchased off the shelf to obtain similar results.
Shoulder Spica for Acromioclavicular Taping
The acromioclavicular (AC) wrap may be applied after an injury to the AC joint from direct contact, such as tackling in football or forced horizontal adduction. The goal of this wrap is to provide protection and general compression to the AC joint and shoulder in general.
Procedure
Materials. Adhesive spray, compression wrap (various widths and lengths), 1½-in. white tape.
Positioning and Preparation. The patient should be placed in a standing or seated position with the involved arm at the side and the hand on the hip. Spray the humerus with the adhesive spray, as this will act as the anchor for this tape procedure.
Application
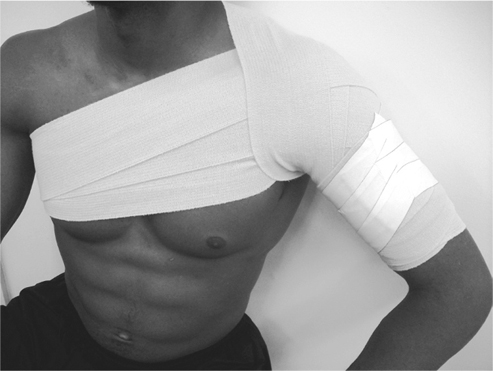
1. Begin wrapping the midhumerus in a clockwise fashion (lateral to medial), and continue in a spiral fashion while overlapping by half the width of the wrap, moving distal to proximal for at least two times around the humerus.
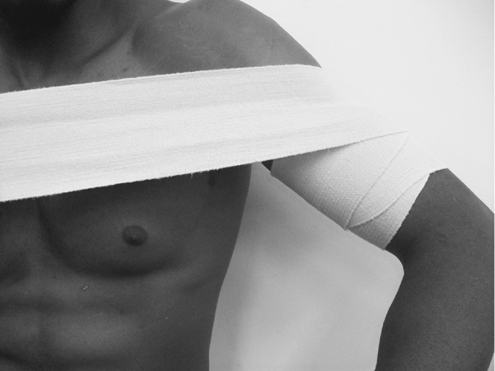
2. Pull medially across the chest and under the opposite axilla, and continue around the torso. Apply the greatest amount of tension over the shoulder and the least amount of tension as you wrap around the torso. Encircle the humerus again.
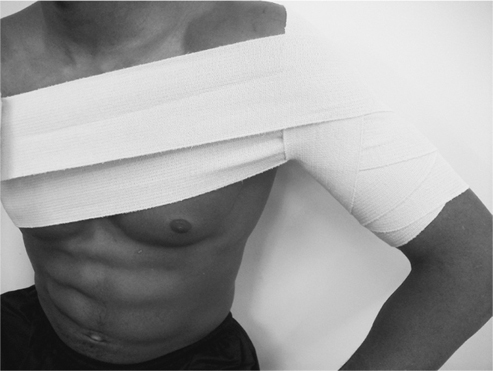
3. Repeat the pattern at least twice or as needed depending on the size of the patient and the support needed. End the wrap on the arm. Secure the wrap with the 1½-in. tape by tracing the pattern on the humerus.
Final Assessment. Check for circulation, and ensure that the application has limited the painful motion and is functional for the athlete.
Additional Notes
In association with many AC joint injuries, an “AC pad” is often applied directly over the AC joint to provide padding to the injured joint below. Apply the AC pad if needed prior to securing the AC wrap.
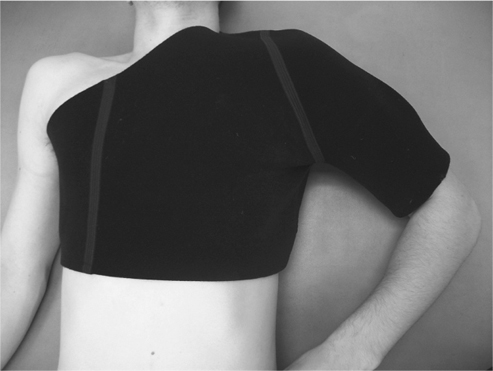
∗Custom/Prefabricated Items. Other commercial items that are commonly used to support the shoulder either after injury or during actual play include the Sully Stabilizing Brace.
Elbow Hyperextension Tape
Elbow hyperextension taping is very similar to the knee hyperextension taping technique. This is applied when an elbow hyperextension injury has occurred, with the goal of limiting painful extension.
Procedure
Materials. Adhesive spray, prewrap, 2-in. heavy-duty adhesive elastic tape, 3-in. adhesive elastic tape, scissors.
Positioning and Preparation. Check the skin for wounds and irritation. The patient should have the affected elbow in slight flexion within a painfree range and supinated. Apply adhesive spray to the forearm and humerus where the tape will be applied.
Application
1. Apply the prewrap over the entire area that will be taped; starting at the midhumerus and continuing distally to the midforearm. (Note: The longer the level of the tape job, the more effective it will be in preventing painful ROM.) Apply two anchors with the 3-in. adhesive elastic tape, one on the midhumerus and the other at the midforearm.
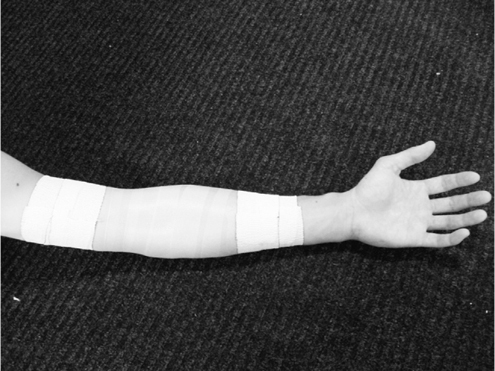
2. Apply a strip of the 2-in. heavy-duty adhesive elastic tape over the anterior elbow. The first strip will begin on the anterior anchor of the humerus and follow the midline of the humerus distally to the forearm, where it ends at the second anchor at the midforearm. Cut off the excess heavy-duty elastic tape.
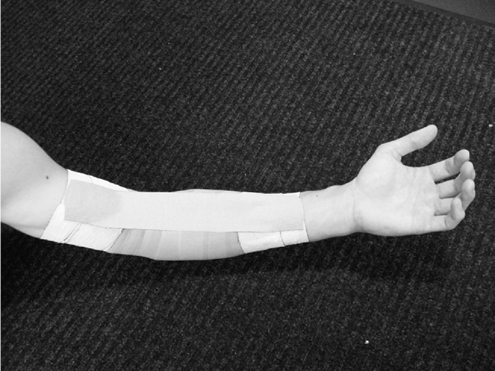
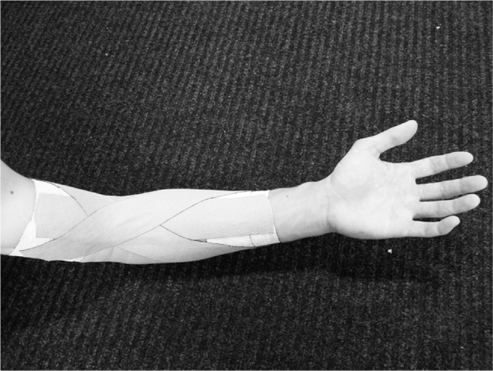
3. The next two strips will create an X pattern over the anterior elbow. The second strip will be applied laterally on the distal humeral anchor, crossing the anterior elbow and ending at the medial anchor on the forearm (ulna). The third strip will be applied medially on the distal humeral anchor, crossing the anterior elbow and ending at the lateral anchor on the forearm (radius). Cut off the excess heavy-duty elastic tape.
4. Cover the tape job with the 3-in. adhesive elastic tape. Note: Do not cover the olecranon process with the tape, to ensure ease of movement.
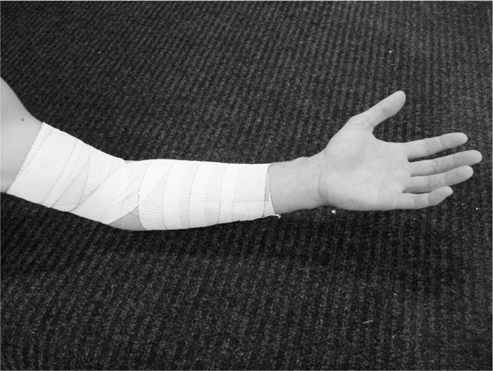
Final Assessment. Check the ROM of the elbow to make sure that it is within the painfree ROM and functional for the patient. Check the distal capillary refill and the comfort of the tape for the patient.
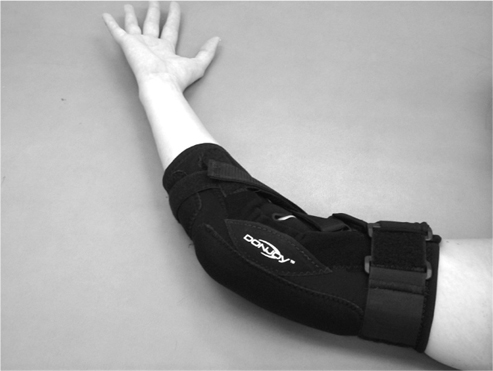
∗Custom/Prefabricated Items. Off-the-shelf braces with an ROM lock can limit the painful motion of the elbow.
Ulnar Collateral Ligament Taping
This taping procedure is similar to the collateral ligament taping of the knee. Collateral ligament taping is applied when either the ulnar collateral ligament (UCL) or the radial collateral ligament (RCL) is sprained. The goal of this tape job is to protect the ligament from further injury.
Procedure
Materials. Adhesive spray, prewrap, 1½-in. white tape, 3-in. adhesive elastic tape.
Positioning and Preparation. Check the skin for wounds and irritation. The patient should be standing with the affected elbow slightly flexed within a painfree ROM and supinated. Apply adhesive spray to the forearm and humerus where the tape will be applied.
Application
1. Apply the prewrap over the entire area that will be taped, starting at the midhumerus and continuing distally to the midforearm. Apply two anchors with the 3-in. adhesive elastic tape over the prewrap, one on the midhumerus and the other on the midforearm.
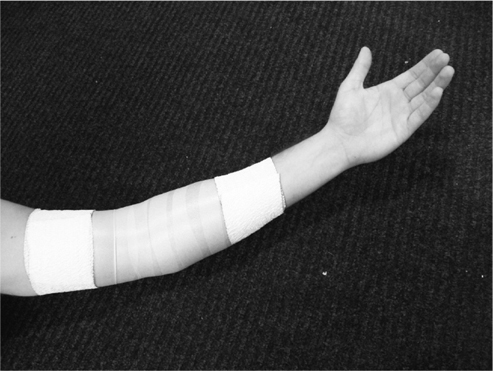
2. Apply strips of the 1½-in. white tape in an X pattern over the UCL. The first strip will be applied on the anterior humeral anchor, crossing the medial joint line and ending at the posterior anchor on the forearm.
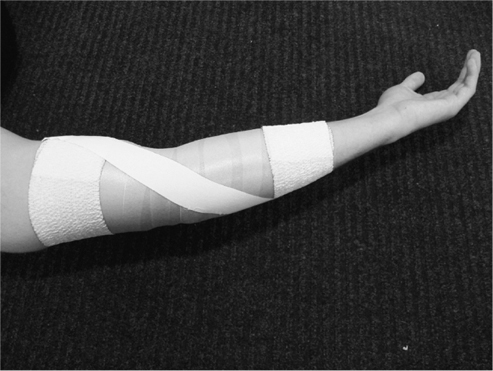
3. The second strip will be applied on the posterior humeral anchor, crossing the medial joint line and ending on the anterior anchor on the forearm.
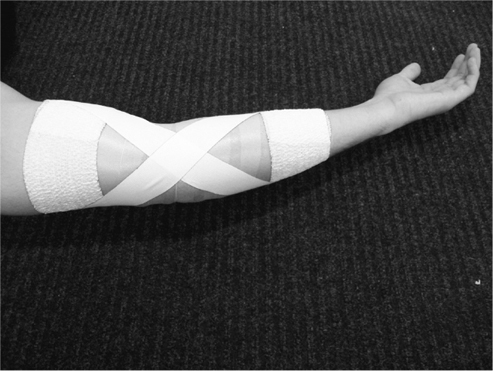
4. Apply two or three more strips as described above, creating an X pattern over the UCL.
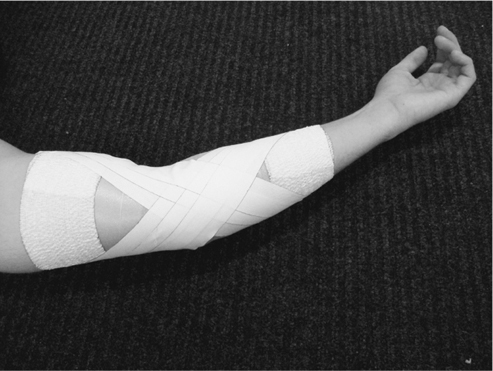
5. Cover the tape job with the 3-in. adhesive elastic tape. Note: Do not cover the olecranon process with the tape, to ensure ease of movement.
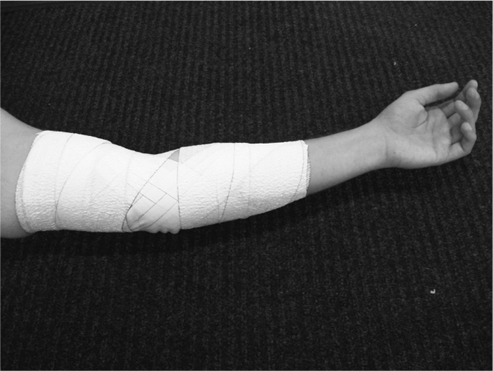
Final Assessment. Check the distal capillary refill and the comfort and function of the tape for the patient.
Additional Notes
To tape for an RCL sprain, follow the previous steps but with the X pattern applied over the RCL.
∗Custom/Prefabricated Items. There are various off-the-shelf braces that can be purchased that will re-create the function of the tape procedure for the UCL.
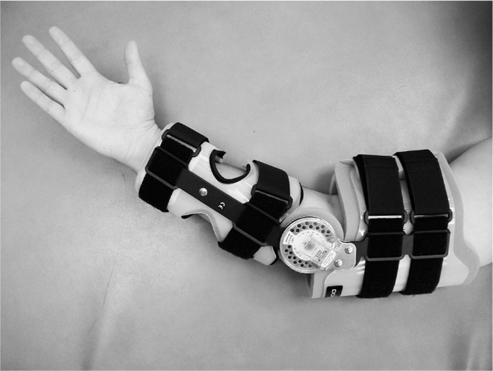
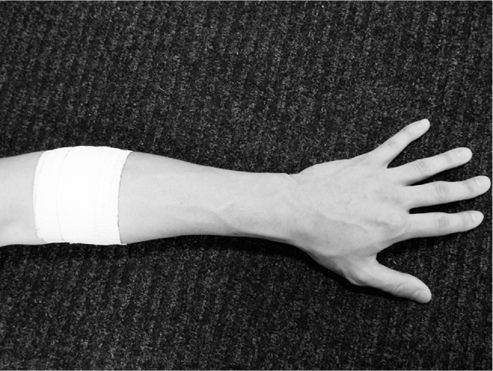
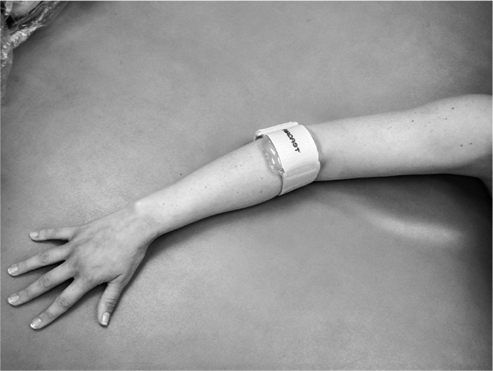
Lateral Epicondylitis Strap
A lateral epicondylitis strap is used for a patient suffering from lateral epicondylitis (tennis elbow). The goal of this tape job is to decrease pain by applying pressure to the common extensor bundle to decrease the stress of the extensor muscles on the bony attachment.
Procedure
Materials. Prewrap, 2-in. adhesive elastic tape, 1½-in. white tape.
Positioning and Preparation. Check the skin for wounds and irritation. The patient's arm should be in a relaxed supinated position.
Application
1. Apply the prewrap around the elbow two to three times distal to the lateral epicondyle, approximately ½ in.
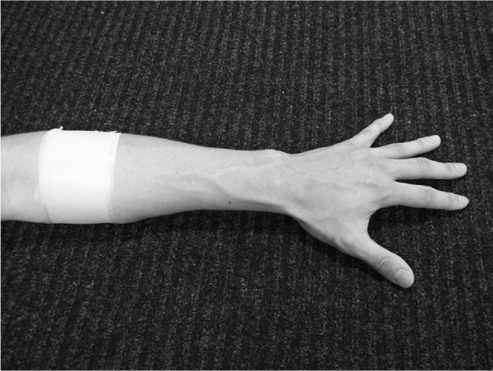
2. Apply six strips of the 1½-in. white tape in the center of the prewrap distal to the lateral epicondyle.
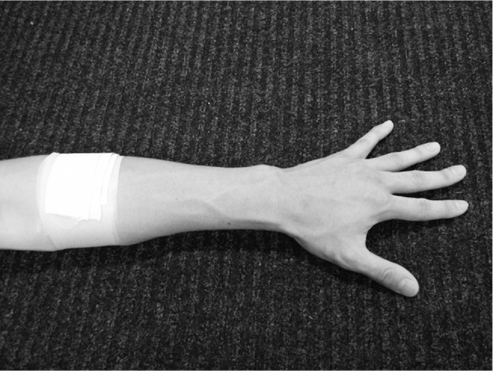
3. Cover the prewrap and the 1½-in. white tape strips with the 2-in. adhesive elastic tape.
Final Assessment. Check the distal capillary refill and the comfort and function of the tape for the patient.
∗Custom/Prefabricated Items. Prefabricated lateral epicondylitis straps can be purchased over the counter.
Wrist Hyperflexion Taping
Taping to the wrist is applied after an injury to any of the carpal bones or the wrist in general or to limit painful motion. The goal of this tape job is to provide stability and limit painful motions about the wrist to allow it to be used in athletic participation.
Procedure
Materials. Adhesive spray, 1½-in. white tape, prewrap.
Positioning and Preparation. Place the patient's wrist in a neutral position with the fingers abducted. Spray the area to be wrapped, and apply the prewrap as needed.
Application
1. Begin by applying two anchors on the midforearm and one around the hand just proximal to the metacarpophalangeal (MCP) joints. Be sure to keep the MP joints uncovered while slightly folding the tape before it crosses the thumb crease.
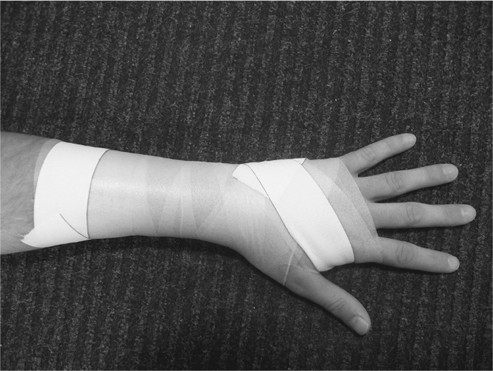
2. Apply parallel strips starting at the anchor on the hand and running to the anchor on the forearm. Complete by applying at least two “Xs” in a similar fashion, crossing over the carpals. Apply parallel strips and “Xs” to the opposite side. If needed, add additional strips to the side in which you intend to limit the most motion (the dorsal side to prevent flexion and ventral side to prevent extension).
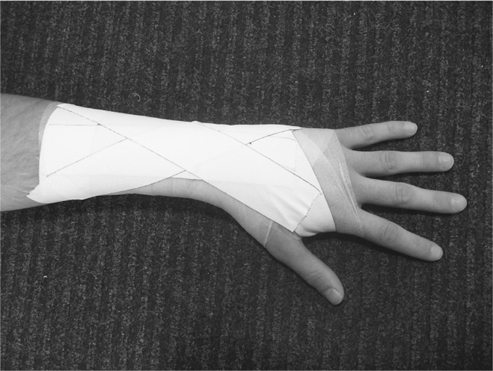
3. Close the entire forearm with the anchors.
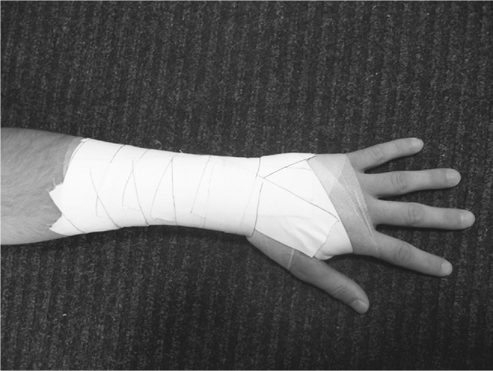
4. Apply two figure-eight patterns starting on the dorsal side at the ulnar styloid process. Pull the tape between the thumb and the index finger, making sure that you place a small fold in the tape as it crosses through.
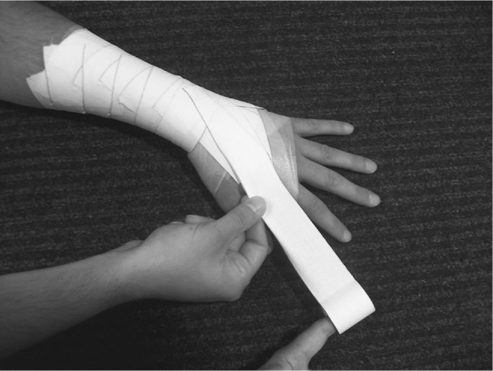
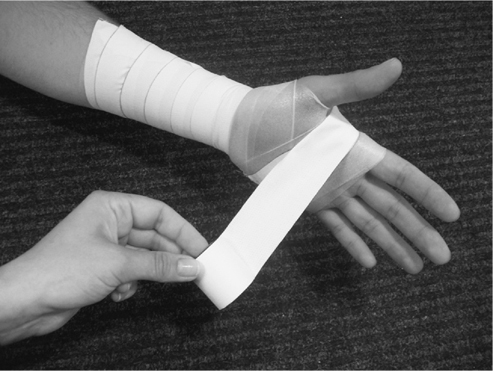
5. Continue to pull the tape across the palm to the dorsal side of the hand.
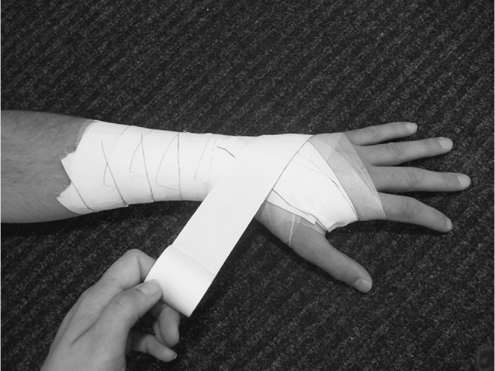
6. Continue to pull around the wrist, and end on dorsal side of the wrist. Repeat as necessary.
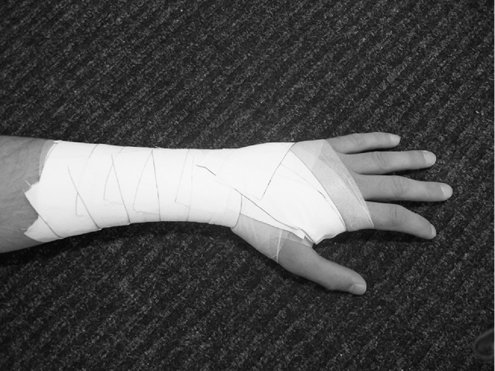
Final Assessment. Check for circulation and ensure that the application has limited the painful motion and is functional for the athlete.
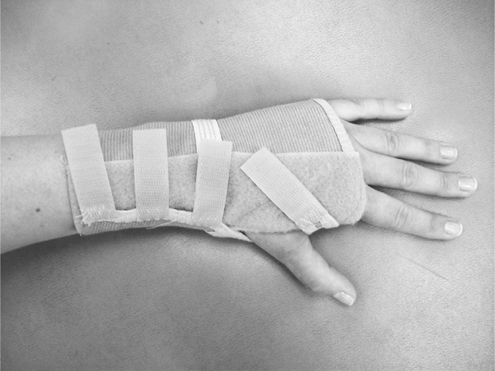
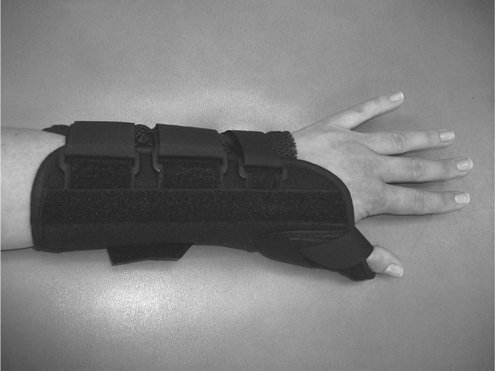
∗Custom/Prefabricated Items. Various prefabricated splints are available, such as the wrist splint. The velcro allows effortless application by the patient.
Buddy Taping
Buddy taping is the easiest and most common taping procedure for a patient to apply. It is typically used when an interphalangeal (IP) joint has been sprained. The goal of this tape job is to use one digit as a support for the injured digit to protect the sprained IP joint from further injury.
Procedure
Materials. Adhesive spray, 1-in. white tape.
Positioning and Preparation. Check the skin for wounds and irritation. The patient's hand should be relaxed and placed in a painfree position. Apply adhesive spray to the digits where the tape will be applied.
Application
The following taping procedure is for a sprained proximal IP of the fourth digit. For any other digits, simply repeat the steps as indicated.
Additional Notes
This is typically a procedure for a sprain in the second to fifth digits; this procedure is not used for the first digit. For a sprained first digit, see the section Thumb Spica.
1. Place the third digit next to the fourth digit in a comfortable, painfree ROM.
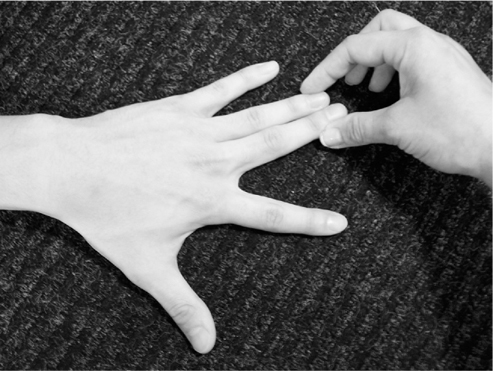
2. Apply a strip of the 1-in. white tape to encircle the proximal phalanges of the third and the fourth digits.
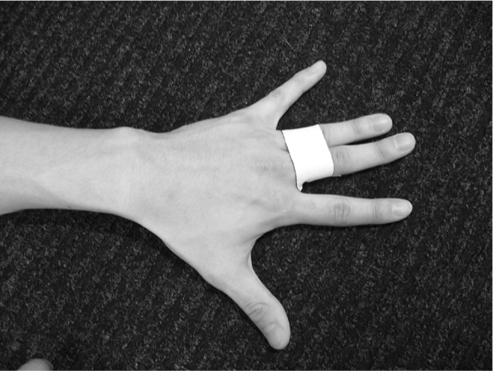
3. Apply a second strip of the 1-in. white tape to encircle the middle phalanges of the third and the fourth digits.
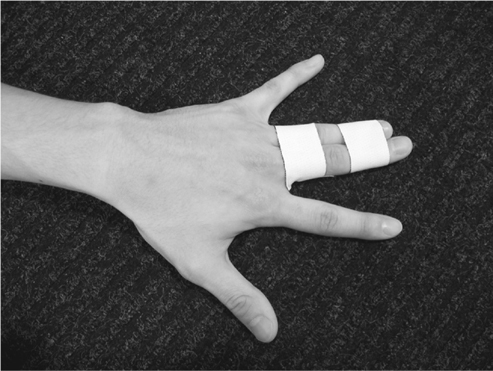
Final Assessment. Check the distal capillary refill of the third and fourth digits. Ensure that the tape is giving support to the fourth digit and is functional for the patient.
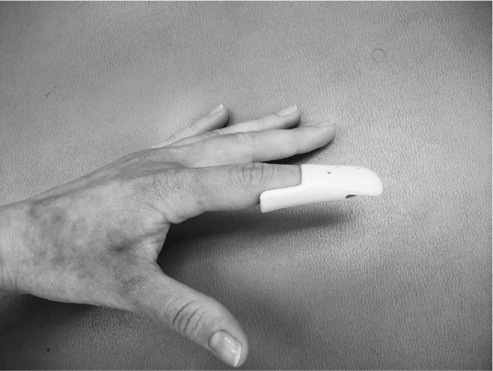
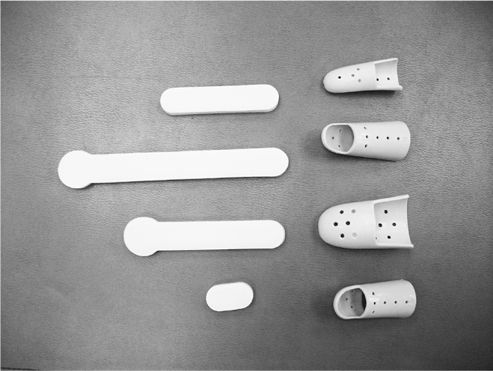
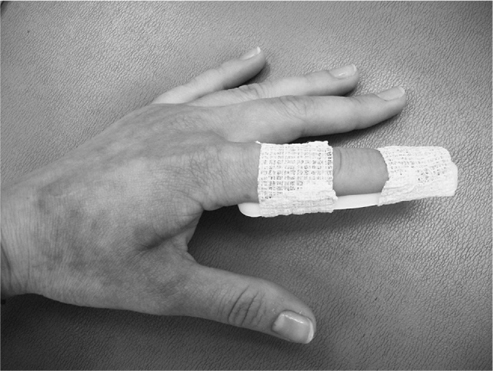
∗Custom/Prefabricated Items. Various prefabricated splints are available, such as the aluminum finger splints and the Stax plastic finger splints.
Thumb Spica
The thumb spica is used when the MCP joint of the first digit has been sprained. The goal is to limit multidirectional instability and prevent painful motion.
Procedure
Materials. Adhesive spray, prewrap, 1-in. white tape, 1½-in. white tape.
Positioning and Preparation. Check the skin for wounds and irritation. The patient should be relaxed, with his or her thumb slightly abducted and extended into a painfree position. Apply the adhesive spray to the first digit and the distal wrist where the tape will be applied.
Application
The following procedure is for a hyperflexion injury to the MCP of the first digit. To prevent hyperextension of the joint, follow the steps below, but place the X pattern on the volar aspect of the thumb.
1. Cover the thumb, the proximal hand, and the distal wrist with the prewrap.
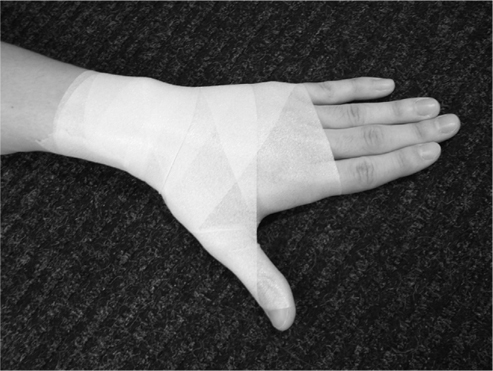
2. Place two anchors with the 1½-in. white tape encircling the wrist.
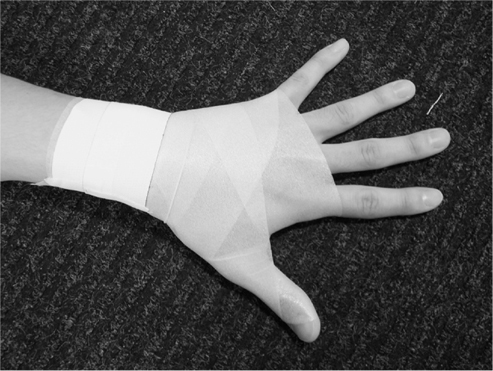
3. Begin a strip of tape on the dorsal aspect of the anchors on the distal wrist. Continue this strip distally, crossing the lateral joint line of the MCP joint of the first digit.
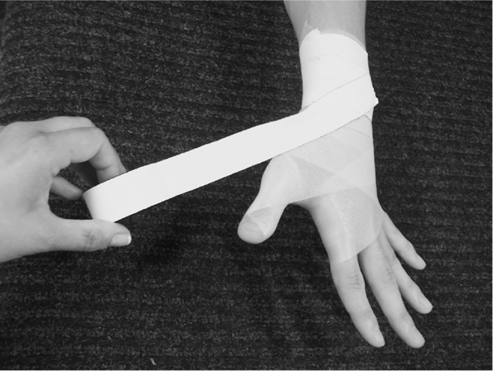
4. Continue the tape around the joint, crossing over the posterior aspect of the MCP joint of the first digit and ending on the volar aspect of the anchor on the wrist. You should have created an X pattern on the dorsal aspect of the MCP joint of the first digit.
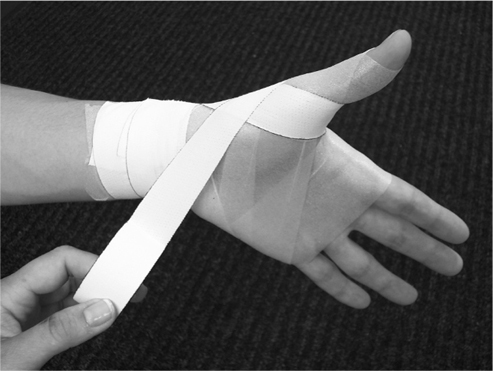
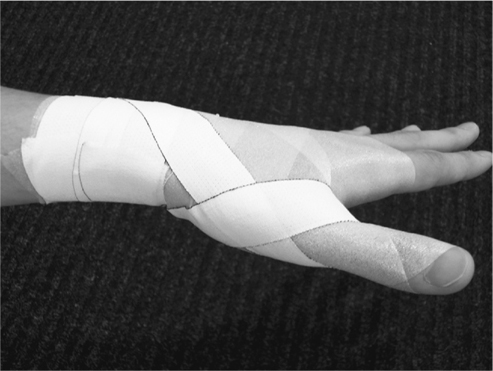
5. Apply one or two more strips as indicated above, moving more distally on the first digit. Note: Do not cross the IP joint of the first digit.
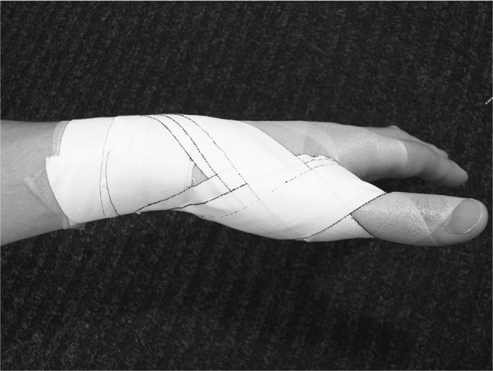
6. Cover the anchors on the wrist with the 1½-in. white tape.
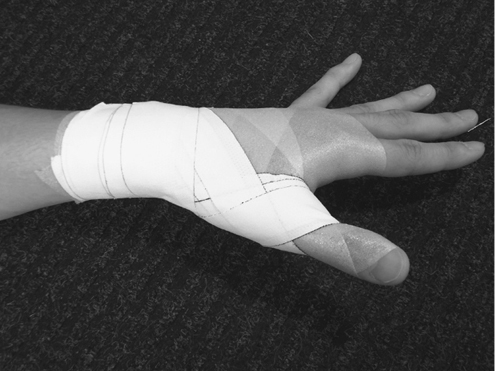
Final Assessment. Check the distal capillary refill of the first digit. Ensure that the tape prevents painful hyperflexion and is functional for the patient.
Additional Notes
Use caution when removing the tape from the first digit, so as to prevent damage to the distal phalanx; removing the tape with scissors is recommended.
∗Custom/Prefabricated Items. Prefabricated thumb braces can be purchased to obtain similar results.
Conclusion
Just as all medical procedures have evolved, so too has the advancement of both taping and bracing applications. Although taping after the initial injury is rare, taping and bracing for support and protection during athletic participation and activities of daily living is a well-established practice that continues to undergo refinement based on sound knowledge and the practical experience of trained practitioners.
Further Readings
- Conditioning and Training
- Aerobic Endurance
- Body Composition (Body Mass Index)
- Burnout in Sports
- Cardiovascular and Respiratory Anatomy and Physiology: Responses to Exercise
- Circuit Training
- Conditioning
- Core Strength
- Cross-Training
- Detraining (Reversibility)
- Exercise Prescription
- Exercise Programs
- Fitness Testing
- Gender and Age Differences in Response to Training
- Home Exercise Equipment
- Immune System, Exercise and
- Interval Training/Fartlek
- Lean Body Weight Assessment
- Osteoporosis Prevention Through Exercise
- Overtraining
- Periodization
- Physiological Effects of Exercise on Cardiopulmonary System
- Plyometrics
- Principles of Training
- Resistance Training
- Speed, Agility, and Speed Endurance Development
- Static Stretching
- Strength Training for the Female Athlete
- Strength Training for the Young Athlete
- Stretching and Warming Up
- Target Heart Rate
- Temperature and Humidity, Effects on Exercise
- Women's Health, Effects of Exercise on
- Diagnosis and Treatment of Sports Injuries
- Acupuncture
- Ankle Support
- Arthroscopy
- Bracing
- Casting and Immobilization
- Complementary Treatment
- Crutches, How to Use
- Dual-Energy X-Ray Absorptiometry (DEXA)
- Electrical Stimulation
- Electromyography
- Extracorporeal Shock Wave Therapy
- Fieldside Assessment and Triage
- Joint Injection
- Joints, Magnetic Resonance Imaging of
- Nonsteroidal Anti-Inflammatory Drugs (NSAIDs)
- Operating Room Equipment and Environment
- Orthotics
- Pain Management in Sports Medicine
- Pharmacology and Exercise
- Physical Examination and History
- Preparticipation Cardiovascular Screening
- Presports Physical Examination
- PRICE/MICE
- Taping
- Ultrasound
- Musculoskeletal Examination Techniques
- Diet and Nutrition
- Calcium in the Athlete's Diet
- Carbohydrates in the Athlete's Diet
- Dietary Supplements and Vitamins
- Fat in the Athlete's Diet
- Nutrition and Hydration
- Postgame Meal
- Pregame Meal
- Protein in the Athlete's Diet
- Salt in the Athlete's Diet
- Sports Drinks
- Vegetarianism and Exercise
- Weight Gain for Sports
- Weight Loss for Sports
- Doping and Performance Enhancement
- Alcohol and Exercise
- Anabolic Steroids
- Beta Agonists
- Beta Blockers
- Blood Transfusion
- Caffeine and Exercise
- Cannabinoids
- Creatine
- Diuretics
- Doping and Performance Enhancement: A New Definition
- Doping and Performance Enhancement: Historical Overview
- Doping and Performance Enhancement: Olympic Games From 2004 to 2008
- Erythropoietin
- Growth Hormone
- Narcotic Analgesics
- Peptide Hormones
- Performance Enhancement, Doping, Therapeutic Use Exemptions
- Stimulants
- World Anti-Doping Agency
- Exercise Physiology, Biomechanics, and Kinesiology
- Injuries and Disorders
- Altitude Sickness
- Athlete's Heart Syndrome
- Bursitis
- Catastrophic Injuries
- Clavicle (Collarbone) Fracture
- Cold Injuries and Hypothermia
- Contusions (Bruises)
- Cramping
- Cyst, Ganglion
- Dehydration
- Epicondylitis
- Exertional Compartment Syndrome, Chronic
- Fractures
- Handlebar Palsy
- Headache, Exercise-Induced
- Hyponatremia, Exercise-Associated
- Lightning Injuries
- Muscle Cramps
- Organ Injuries
- Pectoralis Strain
- Referred Pain
- Rhinitis, Exercise-Induced
- Side Stitch
- Sports Injuries, Acute
- Sports Injuries, Overuse
- Strains, Muscle
- Stress Fractures
- Sudden Cardiac Death
- Tendinitis, Tendinosis
- Tendinopathy
- Trigger Finger
- Trunk Injuries
- Abdomen
- Ankle
- Back and Lumbar Spine
- Back Injuries, Surgery for
- Cervical and Thoracic Fractures and Traumatic Instability
- Cervical Brachialgia
- Intervertebral Disk Disease
- Klippel-Feil Syndrome
- Lower Back Contusion
- Lower Back Injuries and Low Back Pain
- Lower Back Muscle Strain and Ligament Sprain
- Rhomboid Muscle Strain and Spasm
- Slipped Disk
- Spinal Cord Injury
- Spondylolysis and Spondylolisthesis
- Cervical and Thoracic Spine
- Cervical and Thoracic Disk Disease
- Cervical and Thoracic Fractures and Traumatic Instability
- Cervical and Thoracic Spine Injuries
- Cervical Brachialgia
- Cervical Disk Degeneration
- Cervical Facet Syndrome
- Costosternal Syndrome (Costochondritis)
- Intervertebral Disk Disease
- Os Odontoideum
- Scheuermann Kyphosis
- Scoliosis
- Chest Wall
- Elbow and Forearm
- Biceps Tendinitis
- Biceps Tendon Rupture
- Elbow and Forearm Injuries
- Elbow and Forearm Injuries, Surgery for
- Elbow Bursitis
- Elbow Dislocations
- Elbow Fractures
- Elbow Sprain
- Elbow, Osteochondritis Dissecans of the
- Forearm Fracture
- Little League Elbow
- Medial Apophysitis of the Elbow
- Medial Epicondyle Avulsion Fractures of the Elbow
- Olecranon Stress Injury
- Panner Disease
- Posterior Impingement Syndrome
- Posterolateral Rotatory Instability
- Ulnar Neuropathy
- Foot
- Arch Pain
- Athlete's Foot
- Black Nail
- Blisters
- Bruised Foot
- Bunions
- Calluses
- Corns
- Foot and Ankle Injuries, Surgery for
- Foot Fracture
- Foot Injuries
- Foot Stress Fracture
- Hammertoe
- Ingrown Toenail
- Metatarsalgia
- Morton Neuroma
- Overpronating Foot
- Oversupinating Foot
- Plantar Fasciitis and Heel Spurs
- Retrocalcaneal Bursitis
- Sesamoiditis
- Sever Disease
- Turf Toe
- Warts (Verrucae)
- Hand and Finger
- Head and Neck
- Cervical Nerve Stretch Syndrome
- Concussion
- Craniofacial Injuries
- Dental Injuries
- Detached Retina
- Diffuse Axonal Injury
- Ear Infection, Outer (Otitis Externa)
- Ear Injuries
- Epidural Hematoma
- Eye Injuries
- Facial Injuries
- Head Injuries
- Intracerebral Hematoma
- Intracranial Hemorrhage
- Malignant Brain Edema Syndrome
- Neck and Upper Back Injuries
- Neck Spasm
- Nose Injuries
- Punch Drunk Syndrome
- Skull Fracture
- Subarachnoid Hemorrhage
- Subdural Hematoma
- Torticollis, Acute
- Hip, Pelvis, and Groin
- Avascular Necrosis of the Femoral Head
- Avulsion Fractures
- Femoral Neck Stress Fracture
- Femoroacetabular Impingement
- Genitourinary Injuries
- Gluteal Strain
- Groin Pain
- Groin Strain
- Groin Tendinitis
- Groin/Inguinal Hernia
- Hip Contusion
- Hip Dislocation
- Hip Flexor Strain
- Hip Flexor Tendinitis
- Hip Fracture
- Hip Stress Fracture
- Hip, Pelvis, and Groin Injuries
- Hip, Pelvis, and Groin Injuries, Surgery for
- Osteitis Pubis
- Pelvic Avulsion Fractures
- Pelvic Bursitis
- Pelvic Fracture
- Pelvic Stress Fracture
- Perineal Numbness and Erectile Dysfunction
- Piriformis Syndrome
- Sacroiliac Pain
- Sciatica
- Slipped Capital Femoral Epiphysis
- Snapping Hip Syndrome
- Tailbone (Coccyx) Injuries
- Knee
- Anterior Cruciate Ligament Tear
- Articular and Meniscal Cartilage Regeneration and Repair
- Chondromalacia Patella
- Cyst, Baker
- Discoid Meniscus
- Extensor Mechanism Injury
- Iliotibial Band Syndrome
- Juvenile Osteochondritis Dissecans of the Knee
- Knee Bursitis
- Knee Injuries
- Knee Injuries, Surgery for
- Knee Ligament Sprain, Medial and Lateral Collateral Ligaments
- Knee Plica
- Knee, Osteochondritis Dissecans of the
- Kneecap, Subluxating
- Meniscus Injuries
- Osgood-Schlatter Disease
- Patellar Dislocation
- Patellar Tendinitis
- Patellofemoral Pain Syndrome
- Posterior Cruciate Ligament Injuries
- Quadriceps Tendinitis
- Tibial Tubercle Avulsion Fracture
- Lower Leg
- Shoulder
- Frozen Shoulder
- Glenoid Labrum Tear
- Little League Shoulder
- Rotator Cuff Tears, Partial
- Rotator Cuff Tendinopathy
- Shoulder Arthritis
- Shoulder Bursitis
- Shoulder Dislocation
- Shoulder Impingement Syndrome
- Shoulder Injuries
- Shoulder Injuries, Surgery for
- Shoulder Instability
- Shoulder Subluxation
- Superior Labrum From Anterior to Posterior (SLAP) Lesions
- Skin
- Abrasions and Lacerations
- Allergic Contact Dermatitis
- Angioedema and Anaphylaxis
- Athlete's Nodules
- Dermatology in Sports
- Friction Injuries to the Skin
- Frostbite and Frost Nip
- Fungal Skin Infections and Parasitic Infestations
- Insect Bites and Stings
- Irritant Contact Dermatitis
- Jock Itch
- Jogger's Nipples
- Pressure Injuries to the Skin
- Prickly Heat
- Puncture Wounds
- Skin Conditions in Wrestlers
- Skin Disorders, Metabolic
- Skin Infections, Bacterial
- Skin Infections, Viral
- Skin Infestations, Parasitic
- Sunburn
- Sunburn and Skin Cancers
- Toenail Fungus
- Urticaria and Pruritus
- Warts (Verrucae)
- Thigh
- Thorax
- Wrist
- Injury Prevention
- Medical Conditions Affecting Sports Participation
- Allergies
- Altitude Sickness
- Anaphylaxis, Exercise-Induced
- Anemia
- Anorexia Nervosa
- Arthritis
- Asthma
- Asthma, Exercise-Induced
- Atlantoaxial Instability
- Bleeding Disorders
- Bruised Ribs
- Burnout in Sports
- Cholinergic Urticaria
- Complex Regional Pain Syndrome
- Congenital Heart Disease
- Dehydration
- Detached Retina
- Diabetes in the Young Athlete
- Diabetes Mellitus
- Diarrhea
- Exercise and Heart Murmurs
- Exercise and Mitral Valve Prolapse
- Fever
- Functionally One-Eyed Athlete
- Gastrointestinal Problems
- Heat Illness
- Hepatitis
- Hypertension (High Blood Pressure)
- Infectious Diseases in Sports Medicine
- Ingrown Toenail
- Jet Lag
- Liver Conditions, Hepatitis, Hepatomegaly
- Marfan Syndrome
- Neurologic Disorders Affecting Sports Participation
- Obesity
- Respiratory Conditions
- Seizure Disorder in Sports
- Sickle Cell Disease
- Sinusitis in Athletes
- Skin Disorders Affecting Sports Participation
- Anatomical Abnormalities
- Infectious Diseases
- Blood-Borne Infections
- Ear Infection, Outer (Otitis Externa)
- Epstein-Barr Virus, Infectious Mononucleosis, and Splenomegaly
- Fungal Skin Infections and Parasitic Infestations
- Hepatitis
- HIV and the Athlete
- Infectious Diseases in Sports Medicine
- Jock Itch
- Methicillin-Resistant Staphylococcus Aureus Infections
- Pulmonary and Cardiac Infections in Athletes
- Skin Conditions in Wrestlers
- Skin Infections, Bacterial
- Skin Infections, Viral
- Skin Infestations, Parasitic
- Toenail Fungus
- Rehabilitation and Physical Therapy
- Special Populations
- Specialties and Occupations in Sports Medicine
- Athletic Trainers
- Dietitian/Sports Nutritionist
- Emergency Medicine and Sports
- Exercise Physiologist
- Family Doctor
- Group Fitness Instructor
- Manual Medicine
- Orthopedist in Sports Medicine, Role of
- Physiatry and Sports Medicine
- Physical and Occupational Therapist
- Podiatric Sports Medicine
- Sport and Exercise Psychology
- Sports Biomechanist
- Sports Massage Therapist
- Team Physician
- Sport Psychology
- Anger and Violence in Sports
- Arousal and Athletic Performance
- Attention Focus in Sports
- Biofeedback
- Bulimia Nervosa
- Burnout in Sports
- Exercise Addiction/Overactivity Disorders
- Hypnosis and Sport Performance
- Imagery and Visualization
- Leadership in Sports
- Mental Health Benefits of Sports and Exercise
- Motivation
- Overtraining
- Personality and Exercise
- Psychological Aspects of Injury and Rehabilitation
- Psychological Assessment in Sports
- Sport and Exercise Psychology
- Sports Socialization
- Team and Group Dynamics in Sports
- Sports and Society
- Air Pollution, Effects on Exercise and Sports
- Anger and Violence in Sports
- Benefits of Exercise and Sports
- Diversity in Sports
- Doping and Performance Enhancement: A New Definition
- Doping and Performance Enhancement: Historical Overview
- Doping and Performance Enhancement: Olympic Games From 2004 to 2008
- Epidemiology of Sports Injuries
- Legal Aspects of Sports Medicine
- Protective Equipment in Sports
- Sports Injuries, Overuse
- Team and Group Dynamics in Sports
- Title IX, Education Amendments of 1972
- World Anti-Doping Agency
- Sports and Sports Medicine
- Air Pollution, Effects on Exercise and Sports
- Anatomy and Sports Medicine
- Benefits of Exercise and Sports
- Circadian Rhythms and Exercise
- Diversity in Sports
- Emergency Medicine and Sports
- Epidemiology of Sports Injuries
- Exercise and Disease Prevention
- Future Directions in Sports Medicine
- History of Sports Medicine
- Immune System, Exercise and
- Physical Examination and History
- Seasonal Rhythms and Exercise
- Shift Work and Exercise
- Skill Acquisition in Sports
- Sleep and Exercise
- Sleep Loss, Effects on Athletic Performance
- Sports Injuries, Surgery for
- Travel Medicine and the International Athlete
- Women's Health, Effects of Exercise on
- Organizations
- Issues for Practitioners
- Sports-Specific Injuries
- Aerobic Dance, Injuries in
- Archery, Injuries in
- Badminton, Injuries in
- Baseball, Injuries in
- Basketball, Injuries in
- Biking, Injuries in
- Boxing, Injuries in
- Cheerleading, Injuries in
- Cricket, Injuries in
- Dance Injuries and Dance Medicine
- Extreme Sports, Injuries in
- Field Hockey, Injuries in
- Figure Skating, Injuries in
- Football, Injuries in
- Golf, Injuries in
- Gymnastics, Injuries in
- Horse Riding, Injuries in
- Ice Hockey, Injuries in
- Karate, Injuries in
- Marathons, Injuries in
- Mixed Martial Arts, Injuries in
- Mountain Bike Racing, Injuries in
- Outdoor Athlete
- Racquetball and Squash, Injuries in
- Rowing, Injuries in
- Rugby Union, Injuries in
- Running Injuries
- Sailing and Yacht Racing, Injuries in
- SCUBA Diving, Injuries in
- Skiing, Injuries in
- Snowboarding, Injuries in
- Soccer, Injuries in
- Speed Skating, Injuries in
- Surfing, Injuries in
- Swimming, Injuries in
- Tennis and Racquet Sports, Injuries in
- Tennis Elbow
- Triathlons, Injuries in
- Ultimate Frisbee, Injuries in
- Volleyball, Injuries in
- Weight Lifting, Injuries in
- Windsurfing, Injuries in
- Wrestling, Injuries in
- Women and Sports
- Amenorrhea in Athletes
- Dysmenorrhea
- Eating Disorders
- Exercise During Pregnancy and Postpartum
- Female Athlete
- Female Athlete Triad
- Gender and Age Differences in Response to Training
- Menstrual Cycle and Sports Performance
- Menstrual Irregularities
- Osteoporosis Prevention Through Exercise
- Title IX, Education Amendments of 1972
- Transsexual Athletes
- Women's Health, Effects of Exercise on
- Loading...
Get a 30 day FREE TRIAL
-
 Watch videos from a variety of sources bringing classroom topics to life
 -
Read modern, diverse business cases
-
Explore hundreds of books and reference titles
Read next

More like this
Sage Recommends
We found other relevant content for you on other Sage platforms.
Have you created a personal profile? Login or create a profile so that you can save clips, playlists and searches